I must apologise about my poor blogging output over the past year or so, but there have been some big changes behind the scenes which have got in the way of my blogging and brewing...but I've not been completely inactive.
As my regular readers may recall, I've done some test brews using a newer "lagering" method in which lager-style beers are produced using lager yeasts fermented at ale temperatures (post 1, 2, 3 and 4). Motivated by these successes, I've brewed over a dozen lagers using this method in order to refine this process, with my last two batches produced using the same refined method. The first of these was a German-style pilsner; specifically the "Myburger" Bitburger clone from "Brewing Classic Style". Not only was it delicious, but I had trouble telling it apart in side-by-side tastings from its commercial cousin. The second beer was a doppelbock, and was everything I'd expect from the style. The take-home lesson from those two brews is that you can make very good "lagers", true to style, without the need for prolonged cold fermentation. Indeed, the Pilsner was 2 weeks grain-to-glass, and a month for the doppelbock.
All the gory details are below the fold.
Showing posts with label cat_DIY. Show all posts
Showing posts with label cat_DIY. Show all posts
Tuesday, 9 May 2017
Friday, 31 March 2017
Necessity - The Flower Vase of Invention?

Turning around I saw, to my horror, that the plate had thrown the stir bar and cracked the flask (you can see a bit of the crack, left-side of the image). The starter was too big for my smaller flask, so looking around I came across the only available container - a flask of flowers. Long story short, the flowers have been moved to a less visually pleasing container, and a bit of bleach rendered their vase clean and sanitary. The bottom is too thick for the stir plate to work, but it makes for a pretty starter!
Wednesday, 23 March 2016
That moment when you realize you've been doing it all wrong
 |
| Hops in 2013 |
My problems are pretty straight forward - the growth I get is somewhat weak and thin, I don't get a lot of sidearms (which is where hops form), my cones form too early and tend to dry out by early August.
I'll admit that I've somewhat given up hope on finding a solution to my hop-growing woes, but last week James over at Basic Brewing released a podcast in which he interviews a hop farmer - James Altwies of Gorst Valley Hops. As I listened to the podcast I came to realize that my poor yields are likely due to one simple factor - I was doing every last thing wrong.
So what is the magical fix...well short of firing myself that is? There isn't any one thing, but rather several, and the first steps need to start in the next few weeks. As always, the meat is below the fold.
Tuesday, 15 March 2016
Belgian Candi Sugar Part III
Yesterday, Brulosophy published a post where they compared "my" candi sugar recipe side-by-side with a commercial candi syrup. The much more rigorous testing conducted by Brulosophy mirrored my own less scientific experience - i.e. namely that in beer the differences between them are hard to detect, but there are differences. The ability to find these differences appears to vary between people, as in the Brulosophy the majority were not able to tell the differences, but the minority that could tell the difference could do so consistently.
Since my previous posts on the topic (1, 2 and "3", #2 is the primary resource) I've refined my method further. In the discussions following the Brulosophy post its become apparent that I should share these changes as a fair number of people are using my old posts as a starting point in their own sugar experiments (hello, Reddit homebrewers).
The changes I have made seem to address the issues others (and I) have noted - namely an occasional acrid/burnt character. An issue was also brought up by one commenter which I think is worth addressing here.
The changes I've made to my method:
- I've greatly reduced the amount of DME used, as the amount of protein in previous batches was excessive. For 1 kg of sugar (2.2 lbs), I am currently using 5 ml (~1 tsp) of DME. Previously I was using 1 tbs (~15 ml)
- I avoid mixing the sugar as much as possible - I mix to dissolve the sugar into water, and I mix when adding the lye, but I do not otherwise mix.
- I am much more careful and slow with my temperature changes. Most of the mixing I did previously was to add cold water to cool the sugar if I overshot the desired temperature.
- I now usually add corn sugar (fructose) at a rate of 1% volume/mass (i.e. 1 ml corn sugar per 100g sugar). This does not change the flavour of the final candi, but does reduce crystallization. It is easier to then blend the mix into a syrup or cast rocks with the non-crystallized sugar.
These changes have led to a candi which is much closer (to my palate) to commercial candis, one without the unpleasant flavours some of the previous batches had. Others on the thread have mentioned using pressure cookers and other methods with great success. Hopefully, as a collective we will be able to formulate a better method of producing a consistent and flavourful candi sugar for home brewing.
The "Issue":
An issue brought up the commenter 'Chino' in the Brulosophy thread was that the 30 minute inversion time that I recommend is insufficient to completely invert the sugar, with individuals over a Reddit working on ways to get improved inversions. I partially agree with what Chino states - given the rate of the reaction and the fact that it is an equilibrium reaction, a 30 minute inversion period without the addition of something to accelerate the process (e.g. acid) will only invert 8-10% of the sugar. Where I disagree with Chino is that I don't think this matters. Mallard products comprise a pretty small portion of the final sugar - assuming 100% of the protein added via the DME is converted to Mallard products, the Mallard products would comprise about 0.07% of the final candi by weight. Although multi-step reactions, the formation of most Mallard products requires only one sugar molecule per amino acid, meaning that you need "only" 0.07% inverted sugar to be able to (in theory) produce the full array of Mallard products. The 8-10% inverted sugar is a huge excess compared to what is required - this does offer an advantage in terms of reaction rates, but its hard to imagine that increasing inversion to 25% (theoretical maximum using heat alone) or 50-75% (theoretical maximum using acid) would offer further improvements.
Friday, 28 August 2015
2015 Hop Harvest
 |
| Left: Cascade, Right: Goldings |
We had an odd summer this year, leading to less than ideal growth - after drying I ended up with ~200g (~1/2 lb) of Cascade and a meagre 70g of Goldings. That's a 30% and near 80% reduction in yield compared to last years harvest. I think my hops get too much sun, but unfortunately, there is little I can do about that.
Anyway's the hops are dried down, bagged and in the freezer. Hopefully a bitter or brown ale will make the September brew schedule, where the Goldings can shine as a late addition. Given how good it has been the past few years, most - if not all - of the cascade's are going to make their way into a variation of my Black Mamba Imperial Rye IPA (batch 1, 2).
Monday, 18 May 2015
Lacto Starters
 |
| Starter wort, for the L. brevis and L. buchneri to be used in my upcoming beer |
But more on that later. Today's post is on a topic I get asked about with some regularity; namely, how to prepare a starter for Lactobacillus. A proper starter is especially important for sour worting, both to minimize the risk of infection by other bacteria, and also to ensure a reasonable souring time (a few days).
The good news is that lacto starters are easy - almost as easy as yeast, but you do need a bit more equipment.
For the starter you will need:
- 1.040 starter wort (or apple juice, or MRS media)
- Yeast nutrient (optional, but a good idea, especially if using apple juice)
- A temperature controller
- A heat source (I use a crock-pot)
Tuesday, 31 March 2015
Canadian Bacon Ya'll
 |
| Homemade peameal (sans meal), ready for frying |
My international readers probably have no idea what I'm talking about - this isn't your classical salted and smoked pork-belly bacon, nor is it the product sold in some US states as "Canadian bacon" - this is a much more refined piece of cured meat; a cross between a corned beef, ham, and classical bacon. It is a brined pork loin, which after brining is typically rolled in either corn meal or white pea meal before cooking. You can slice it thin and serve it with breakfast, or smoke it to make a great sandwich meat, or even slice it thick and fry (or BBQ) it and eat it on a bun. And as with beer, it is easy to make at home, and when "home brewed", yields a product superior to that sold in most stores.
Recipe and all that other fun stuff below the fold...
Tuesday, 21 October 2014
Upgrading a Costco Kegorator
 |
| This is an obvious one - the kegorator fits two corney kegs (pin locks and ball locks fit). So a two-tap tower is a fairly obvious upgrade. Not shown here is making sure you beverage lines are 3-4 m (10-12') long will help provide smooth pours. |
 |
| I always struggled with my long beverage lines getting in the way. Coiling them with pull-ties helped a little, but it turns out the real secret to getting your lines out of the way is a couple of feet of 3-conductor wire left over from a reno (yellow, more obvious in then full-sized image). First, wrap a bit of the wire around the coiled beverage lines, and then make a small "hook" at the end of the wire - this will let you hang the lines against the cold-plate, hooking into any of the multiple convenient cut-outs in the cold plate. |
 |
| A gas manifold greatly aids in controlling CO2 flow to your kegs. But wait...why a 3-way manifold? |
 |
| Adding a 3rd line to the manifold, along with a MFL connection, allows for a "special uses" line. In my case I have three ends - a ball-lock gas-in for use with a carbonation cap or if a friend brings over a ball-lock keg, a pin-lock gas-in for purging the headspace of a filled keg or temporarily hooking up a 3rd keg, and a liquid-out pin-lock for purging kegs prior to filling and for use during carbonation (to bubble the CO2 through the beer) |
 |
| Of course, no kegorator would be complete with some custom tap handles. |
Friday, 4 July 2014
2014 Hop Garden
Its been a while since I posted, but in my defence I was away on holiday and had bigger fish to fry. While I was away y hop garden really took off, so I thought I'd post a few shots.
|
|
|


Sunday, 30 March 2014
Simple Hop Spider
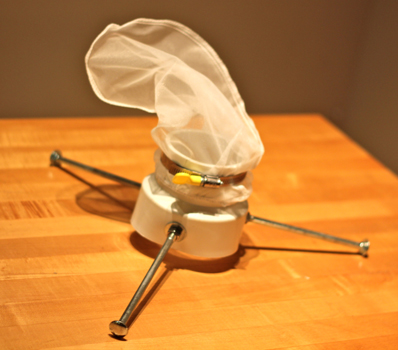 |
| BYO's hop spider |
One simple invention that has come along since then is the hop spider. For those who haven't heard of these, the retain pellet hops in the boil, reducing the amount of trub you have to deal with post-boil and preventing clogging of your system. The classic hop spider is a 4" to 3" PCV coupler with 3 or 4 carriage bolts sticking out of the wide portion and a fine mesh bag held onto the bottom with a screw-clamp (see image above). While a brilliant invention, I've always disliked them for two reasons - the get in the way of the lid, and the sized bag usually used concentrates the hops; IMO, likely reducing alpha acid extraction efficiency. Moreover, it doesn't let you adapt to different sized batches in your brewpot.
My hop spider (details below the fold) overcomes these issues - and costs less to build to boot!
Monday, 2 December 2013
Labelling a Special Brew
Bottling is a labour-intensive activity; made more so if you throw labels onto the damned things. Kegging has allowed me to avoid much of this pain, with "labelling" being nothing more than making a single hockey-card sized label to load into my tap handles.
These days my bottling activities are limited to making a few bottle to give away to friends or to take to my brewclubs meetings. The only real exception to this is when I brew a long-ageing beer that I wish to cellar for months-to-years. I recently bottled my Gnarly Roots Barley Wine. Seeing as this beer is intended to be aged & enjoyed over years I went whole-hog on the labels - "ageing" the paper, generating a front label as well as four slightly different back labels, and even waxing the caps. While the picture below is not perfect, it gives you an idea of how they turned out.

One friend who I showed these to asked how I aged the paper & waxed the caps. I agreed to do a brief post on this, so here it is - methods below the fold...
Tuesday, 22 October 2013
10 Dollar, 10 minute Tap Handels

The design is simple - the centre pin of a pre-turned replacement chair leg is removed and replaced with a threaded insert which allows it to be screwed onto a keg post. A bit of the handle is cut away to allow a steel mending plate to be attached vertically to the tap - this holds the card protector/label in place via a strip of magnetic tape attached to the back of the card protector.
This has a number of advantages - aside from letting a label do double duty as both a bottle label & keg label, the labels from old batches of beer can be stuck to the keggorator/keezer - ala fridge magnets - allowing them to be reused and providing a bit of visual appeal to the fridge (and working as a reminder of the many magnificent brews that have passed through your kegs).
Very few tools are needed for this project - a saw that can do fine cuts (I used a table jigsaw, but a jewellers saw or razer saw would work equally well), a screwdriver, a pair of pliers, a hand drill, and a paint brush!
Details of the build can be found below the fold.
Sunday, 6 October 2013
Belgian Candi Sugar II
EDIT: I have refined this process somewhat. Please see this this post for some simple changes to my procedure which leads to a better tasting and more consistent candi.
As described a couple of posts ago, I have been working on a method to prepare Belgian Candi Sugar at home. This method uses commonly available household ingredients to prepare the sugar, and requires no more equipment than you'd normally find in your average kitchen. I have posted my method in the following video, with this post acting as a synopsis you can follow in the kitchen.
I owe a debt of gratitude to a few bloggers for helping me find my way - in particular, I'd like to direct you to the posts on Ryan's Blog, Life Fermented and on An Engineer & His Carboy for the posts that directed my attempts. Before I go into the details I'd also like to point out that the method outlined in my video and in this post are the product of about a half-dozen trial runs. As such they represent a process in development, and may be subject to future improvements. If you have any luck (or ill-luck) in trying to make your own candi sugar, please let me know in the comments.
EDIT: I have solved some of the crystallization issues people have been reporting when making candi sugar. Details can be found in this blog post.
As described a couple of posts ago, I have been working on a method to prepare Belgian Candi Sugar at home. This method uses commonly available household ingredients to prepare the sugar, and requires no more equipment than you'd normally find in your average kitchen. I have posted my method in the following video, with this post acting as a synopsis you can follow in the kitchen.
EDIT: I have solved some of the crystallization issues people have been reporting when making candi sugar. Details can be found in this blog post.
Monday, 9 September 2013
Making Belgian Candi Sugar
 |
| The Belgian Candi Sugars Left: Attempt #1, Right: Attempt #2 |
One style I've always enjoyed, but rarely brewed, are the strong Belgian (trappist-style) ales. With lots of fruity esters and spicy phenolics, these beers are flavourful & well balanced. Their high-alcohol & dry finish makes them easy to drink, with the dryness deceptively hiding their strength.
The key to making these beers strong (7-12% alcohol) with a dry finish is the use of Belgian candi sugar - beet sugar which is heated & otherwise treated to create a candi (or syrup). Depending on how it is prepared, this candi can be anything from a light-amber with little flavour through to near-black candis with flavours of coffee, chocolate and dark fruits (e.g. plums & dates). It is the cost (often over $16/kg), and difficulty finding this product in Canada which has largely held back my ability to brew & explore Belgian strong ales.
So imagine my joy when finding out that it may be possible to produce Belgian candi sugar at home. Armed with one youtube video & a short write-up I embarked on my first experiment. After nearly two hours of heating, with little colour formation, I started reading further. It turns out I - and many other brewers out there - are doing it wrong!
Below the fold is my attempt to fix my mistake, and perhaps establish a method others can employ...
EDIT: I have solved some of the crystalizaiton issues people have been reporting when making candi sugar. Details can be found in this blog post.
Wednesday, 13 February 2013
Brewing Challenge: The Grocery Store Brew
 |
| Home Malting Quinoa L-R: Raw white quinoa, partly malted, dried & roasted. |
The first "group brew" of 2013 is more a challenge than a brew - the goal is to produce the best beer you can sourcing as many ingredients from the grocery store as you can. The official rule is that a minimum of 50% of ingredients should be from the grocery store. But many of us - myself included - are shooting for a higher percentage than that. In my case, I'm going for broke and sourcing 100% of ingredients from the grocery store.
Since barley & hops are not normally found in grocery stores, I am adapting via a mix of historical and modern approaches - namely, replacing hops with a herb mixture used prior to the widespread adoption of hops, combined with a modern health-food craze - quinoa (pronounced "keen-wa") - malted, dried and toasted by myself, to replace the barley that normally comprises the base malt of beer.
This post is being assembled over several days, and will be fairly extensive, so all of the details can be found below the fold.
Thursday, 13 December 2012
I'll be home for XMas
Well, not really. But I do have a Christmas 6-pack waiting for me under my tree.

As you can see, a very angry penguin is guarding it for me...

As you can see, a very angry penguin is guarding it for me...
Saturday, 29 September 2012
Simple Time-Saver
Measuring out beer volumes is not always easy - 18.7L of water = 19 measures with our 1L measuring cup. A simple way to deal with this is to mark your bucket - carefully measure out set volumes, let the water stop sloshing around, and pen it in. It'll save you valuable time in preparing your beer.


Sunday, 5 August 2012
Two Problems With Kegging
My recent foray into kegging has revealed two serious problems. The first of these has to do with my kegorator setup.
 The problem, as you can see to the right, is whenever I pour I get a head of foam. At first I suspected the usual suspects - bad poor technique or beer lines which were too short. But a closer look revealed something different:

At the beginning of the pour (top), pure foam comes out of the tap. But after a few seconds, a proper pour ensures (below). After the first glass, I can pour successive glasses that are perfect pours.

A bit of searching identified my problem - the beer lines in the tower were not being cooled, so the first bit of beer to pass through warmed, releasing its CO2, causing the foaming. The flowing beer then cooled the line, resolving the issue.
Problem 1: Beer lines in tower are warm.
Solution: Create a heat-sink.
More below the fold...
Thursday, 21 June 2012
Labelize the brew
I've been brewing for nearly 18 years, but despite that, I've never given much thought to naming my beers, nor to making labels for my bottles. Motivated by the amazing labels some brewers have made (here's a whole thread of amazing examples, over at HomeBrewTalk), I decided to try myself. Being both a professional scientist, and a science nerd in general, I've decided to go with science-themed beer names.
This is my first attempt at a label, for my first all-grain beer since returning to brewing:

This is my first attempt at a label, for my first all-grain beer since returning to brewing:
This is a 'tax stamp' style label, with the brewery logo (the black circle) centred over the cap, and the remainder glued to the neck of the bottle. The QR code (generated by the excellent free service at http://www.qrstuff.com) encodes the recipe for 23L (5 imp Gal/6US Gal) of beer. The beer itself is a heavily hopped pale ale, with a bit of a kick (6.0% ABV; in reality its probably 6.2%).
As for the name - parallax is a way of measuring distances by measuring the apparent change in position of an object as the position of the observer changes. Its used to plot the position of close stars, by measuring the change in position of the star as the earth moves 1/2 way through its orbit. What does parallax have to do with beer? Very little - unless you drink too much, after which your defocused eyes may give you a bit of a sense of parallax...
Subscribe to:
Posts (Atom)