Monday, 3 September 2012

Überschuss = Übergood

So the Überschuss European Ale is in the keg.  It turned out very well, especially considering I essentially pulled the recipe out of my ass.

The beer stayed in the primary for 3 weeks - AKA the time from brew-day to the return from my holiday.  After transferring to the keg I added 1 package of "bloomed" gelatin to help clear the beer, and put it in the fridge under ~13 PSI of CO2.  One week later it was cleared and carbed.

The beer itself was darker than expected, and pours with a bubbly head that collapses over a few minutes into a thin, but creamy, lace that lasts the whole pint.  As you can see, my keggerator woes were not completely fixed by my modification to my kegging setup, meaning I still have a bit of building to do.

Taste-wise, it is a pleasant surprise.  Before you sip, you're hit by a bit of maltyness with a hint of floral hops.  Those characteristics continue on into the taste - a sweet, but not overpowering maltyness, with a nice balancing (but not strong) bitterness.  The flavour and aroma of noble hops is present, but again, not overpowering and nicely balanced with the maltyness of the brew.  At first it finished with an almost-unpleasant lingering bitterness.  That is already beginning to fade, and should be gone within a couple of weeks - likely about the same time I empty the keg.

This one will, without a doubt, be brewed again.

Brew Day: Vestigial Bitter

Today I continue my mission to rid myself of some leftover brewing ingredients, before they go off.   The second recipe in this quest is a common English bitter - and unlike my Überschuss European Ale, this one is pretty much by-the-book.

The brew session went without hiccup.  Hit of OG right on, colour looks good, smells good too.  Despite the 30C temps, I managed to re-do all of the hangers in my garage during the boil - AKA multitasking!  It'll be a few weeks until we know the real story (about the beer; the garage is fine), but I have high hopes.

No pictures from today's brew session - but you will find the recipe below the fold.

Brew Science: The Iodine Test

This is in first of a series of articles about the science behind basic brewing processes.  These articles will explain how many of the procedures we use in brewing work - and hopefully provide sufficient information on how to make us of these tests/processes in your own brewing.

An iodine test [wikipedia] is used by brewers to test for conversion of unfermentable starches into the mixture of fermentable sugars and unfermentable dextrins which comprise the sweet wort we ferment to make beer.

The presence of starch in beer is very much unwanted.  Starches cannot be fermented, and induce an unpleasant appearance and feeling the the resulting wort.  In contrast, fermentable sugars (mostly glucose, or 2-3 glucose's attached togeather - AKA maltose and maltriose) are consumed by yeast to make alcohol, and unfermentable dextrins (short chains of glucose) which impart a malty flavor and mouth-feel to the beer.


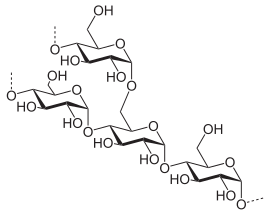
Left: the branching structure of starch.  The '...' link to additional starches of glucose molecules (see below image).  A single starch molecule will be comrpised of many hundreds of glucose molecules.

Above: the structure of the long chains of glucose.  
 A single molicule of gluocse.  Images from wikipedia.

The process of breaking down starch into sugars and dextrins is called saccrification (or conversion), and is driven by soaking grain in water at the desired temperature (generally 63-66C).  At these temps, enzymes called amylases break down starches into sugars and dextrins.  Many beginning brewers simply wait-and-hope for conversion to complete.

If only there were a better way...

Tuesday, 28 August 2012

Why didn't I Buy This Earlier?

Before departing on my holiday I mail-ordered a large-diameter (1/2") auto-siphon.  What is an auto-siphon you ask?  It is this:

Basically, its a siphon you start by pumping the racking cane (the hard plastic portion of the siphon) inside of a wine-thief like outer tube.  Pumping primes the siphon, then you set back and let it rip.  No sucking beer into the siphon, no pre-filling the siphon with water, no fingers plugging the business end, no accidental contacts while trying to move a filled siphon into the beer and empty keg.  Simply clean, insert into beer/keg, pump a few times, and away it goes.

This thing is a huge time (and pain) saver.  It takes a few seconds longer to sanitize, but starts in a few seconds, and the larger diameter of the siphon drained 20L of Überschuss European Ale into a keg in less than two minutes - far faster than the normal 5-6 minutes usually required to transfer that much beer.

Faster and easier - and probably a lesser chance of infection as well!

Monday, 6 August 2012

Eight Hundred Billion

This is either the happy, or depressing, thought of the day.

I am in the process of trying to setup a yeast bank so that I can share yeasts with brewers around the country.  As part of this, I've been researching yeast growth characteristics in wort under various conditions.

As part of this research I came across a staggering number - 50,000,000.  That is, on average, the peak number of yeast you'll find in the average batch of homebrew  - per millilitre.  Fifty million per mil (range is 40-60 million/ml).

Wow.

Taking into account the average sized batch of beer (5US gal, 19L), and the amount of yeast typically left in finished (unfiltered) beer, that works out to 800,000,000,000 yeast dying for one batch of beer.  Eight Hundred Billion.

Yes, billion - with a 'B'.

I've got to work that into a label for a future batch of beer - something like 'Eight Hundred Billion yeast died to bring you this beer - you better enjoy it'.

Too dark?

Sunday, 5 August 2012

Emergency Brew Session - Überschuss!

As mentioned in my last post, I have a problem with my kegging system - I drank all the beer, and didn't have a new batch on-route.

This isn't the first time my consumption has exceeded my brewing, but my usual solution - a quickly-made English bitter (ready in as little as 10 days) - was not in the cards as I'm off for two and a half weeks at the cottage (you're bleeding for me, I know it).

Not  only that, but I had some leftover hops and grain from my last batch - the hops especially need to be used as their shelf-life is not great.  Using a few brew book and the net I cobbled together two recipes that would deplete this store.  The first of these is a real hodge-podge of stuff, that may or may not be a good brew.  Its vaugly formulated on an European-style ale (i.e. an Altbier).  The second, to be brewed when I get back from the cottage, is a more traditional English Bitter.

Todays brew - Überschuss European Ale

Überschuss (German): surplus, excess

More below the fold

Two Problems With Kegging

My recent foray into kegging has revealed two serious problems.  The first of these has to do with my kegorator setup.

The problem, as you can see to the right, is whenever I pour I get a head of foam.  At first I suspected the usual suspects - bad poor technique or beer lines which were too short.  But a closer look revealed something different:

At the beginning of the pour (top), pure foam comes out of the tap.  But after a few seconds, a proper pour ensures (below).  After the first glass, I can pour successive glasses that are perfect pours.


A bit of searching identified my problem - the beer lines in the tower were not being cooled, so the first bit of beer to pass through warmed, releasing its CO2, causing the foaming.  The flowing beer then cooled the line, resolving the issue.

Problem 1: Beer lines in tower are warm.
Solution: Create a heat-sink.

More below the  fold...